


Music today is full of exciting, envelope-pushing textures, thanks to advancements in technology and process. Increased ease of access has created new realms of sonic experimentation. These exciting conditions aside, it is incredibly difficult to create sounds we like or that resonate within us. Electronic music-makers often hyper-focus on making a sound ‘perfect.’ While this mindset has application, it is an entirely non-musical and unachievable goal. By assigning polarizing opinions and perspectives, we lose sight of one of the most important parts of music: How it makes us feel in our core.
Having the ability to visualize and edit your audio waveforms is helpful in many different ways, especially compared to sequencing and arranging MIDI values. While MIDI allows control, committing to a sound allows you to live within it. Also, as we mentioned in our previous article regarding resampling, the less VST plugins, effects, and MIDI instruments you’re running, the faster your computer will run.
The Advantages of Bouncing to Audio
With audio, you can hone in on the waveform and make ultra-precise editing moves. By this, we mean applying fades to remove pops and clicks, adjusting the timing, observing waveform levels, investigating sound problems, and more. By bouncing your tracks to audio, you firmly cement your ideas and concentrate your focus. It also keeps you from drifting into a dangerous cycle of changing things endlessly. Then you end up with no direction or motivation, as well as a good deal of lost momentum!
In Ableton, it’s incredibly simple to bounce out audio; you can export an individual track with the ‘Export Audio/Video’ function, or you can resample audio using either the ‘Resampling’ command or the ‘Freeze Track’ and ‘Flatten’ commands. The main difference between these two methods is that Live’s ‘Resampling’ option will route the Master output to the recording track.
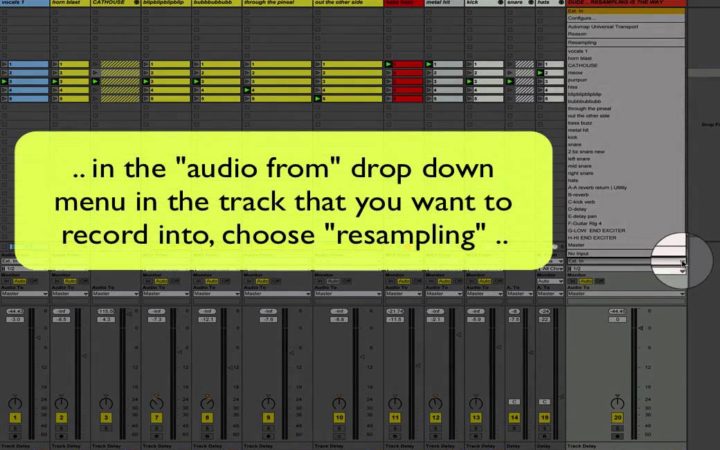
Credit: ableton ideas (YouTube)
Clean Bass Across the Spectrum
Application of this concept is incredibly useful for creating clean, punchy basses. Start with a bass sound that you like and add your desired effects/processing. Then, program a pattern to your liking, all on one note. Now, pop an EQ onto your track and clean up your bass domain, shaving off inaudible or potentially conflicting parts. Finally, slap on a compressor and really fatten up the signal of your bass sound.
Take the audio of this track and modulate the pitch to preserve your EQing and compression. You can also throw a note of the finished bass patch into a sampler and go from there! This way you can actually get back into the MIDI, but with an audio and visually-aided understanding.
Generally it’s a good rule of thumb to keep a duplicate of your ‘unflattened’ or resampled audio. This way you can go back and tweak reverbs, delays, timing, etc., or the sound all together. In fact, make it a habit to save or freeze old versions of tracks/mixes so that you can always go back and compare. It’s also a great way to get inspiration or to hear and recognize specific elements of your music and sounds.
Important things happen in Pacific Northwest nightlife, and DMNW will send you alerts!

